
Nova Guitar - Progress

Nova Bassmaster body progress
Time for an update on the Nova Bassmaster. I say 'time' but what I actually mean is 'incredibly overdue'. Sorry about that but, when things get busy, sometimes blog posts and updates fall behind.
Rest assured though, that progress on the Bassmaster has been… well… progressing. The image on the left shows the body with the additional control cavities cut.
Also new since the last update is the neck pocket. In common with the Haze Blue Collar, this instrument also has the neck pocket cut at a slight angle (about 2°). It's not strictly necessary on this bass but doing so allows me to get a little more break angle from the strings over the bridge. This improves the tone and sustain and helps keep everything in place down there.
Most of the work since last time, however, has gone into the neck.
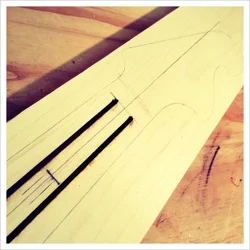

The first image above is mainly just the outline where the neck will be cut from this maple blank. You've probably spotted two channels already cut. These are actually going to hold carbon-fibre rods that will help to stiffen the neck and prevent the tension of those six, chunky strings from bowing it too much. The rods are epoxied in place and, as they're carbon-fibre, they don't add any weight to the neck. There will be an adjustable truss-rod too, of course but I thought you might find this interesting.
The image on the right shows the fingerboard being glued to a neck. Yep, those are rubber bands. Actually those are two very, very long rubber bands and they are great for jobs like this. They provide a firm, even pressure that's perfect here. Seriously.


On the left is what we end up with. A flat hunk of maple in a vague neck shape and a flat lump of ebony stuck on top. Incidentally, I've already slotted the fingerboard as it's easier to do that before it's glued in place.
What we need to do is to start shaping things. The overhang of the ebony fingerboard is removed. Then the recessed headstock face is cut. The fingerboard is radiused and I wonder—as I always do at this point—why on earth I would bother to work with a wood as bloody hard as ebony. The reason, of course, is that it's a beautiful looking and sounding wood but, damn, it's hard work.


Fretting time. On the left, you'll see some of the tools I'll use. When I started doing this racket, I hammered all my frets in (old skool). I began to press frets in more and more (mainly as good tools became available to me). Oddly, in the last while, I've been making the move back to hammering more often. Whatever way they go in though, I almost always now use glue too. Glue-in fretting has become pretty popular with repair-guys and smaller builders over the last ten or fifteen years. For good reason, I think. It's not always merited on repair work but I tend to glue frets on most of my own builds. It slows the job a little but I think it's worth it.
There are a number of different methods of glue-in fret jobs for a number of different jobs and builders' preferences. That's possibly a topic for another day though.
Speedy catch-up: Frets glued and clamped until dry. The fret-ends on the edges are brought flush with the sides of the fingerboard so a player won't have to rush to the Lacerated Hand Ward of the nearest hospital while the ends on top of the fingerboard are bevelled at an angle to feel more comfortable. Then, the curve at the back of the neck is roughed in before being more carefully carved. After that, a lot of sanding and it's ready for finishing.
And that's where it is right now. More soon.
