
Nova Guitar - Progress

Let's see what's happening on the Radio Nova prize winner's guitar.
Last time around, we saw the neck completed—it was cut, shaped, carved, fretted and so on. That and the body were sanded.
A lot. Finish-prep really builds those arm muscles. There are a number of sanding stages, each with a slightly finer grit and each involving a lot of inspection for little imperfections in the wood that will translate into bigger imperfections in the finish.
Finally, though, it's ready for some finish.
Finishing schedules vary depending on what you're working on, what you're using, what effect you're trying to achieve, and exactly seventy-three other factors. Well, more or less. What I'm getting at, though, is that there isn't a definitive way of going about 'finishing a guitar'. With that in mind, let's take a look at how this Bassmaster has been finished.
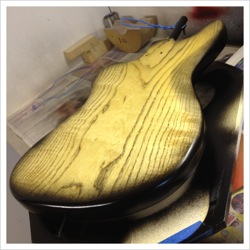
As the body is a nice piece of ash, I've decided to accentuate the grain a little. Some creative grain-filling will do the job.
Grain-filling, by the way, is necessary on certain woods in order to achieve a smooth, flat finish. Many woods (ash, for instance) are considered 'open pore' woods. This means that the grain pattern tends to have a lot of tiny holes or pores. If these aren't filled, the finish applied will simply sink into the pores and won't allow that perfect gloss that many like to see on their guitar. The grain doesn't have to be filled and leaving it unfilled is perfectly acceptable if that's the effect you're going for. Here, it's not.
I (usually—see above about schedules) shoot a sealer coat onto the wood before filling the grain as that tends to make it a little easier to manage filling. After grain-filling, I carefully remove the excess filler and let it dry. Then I seal that in too. That's the stage you see in the first image above.

Now to take some of that pale look off the wood and warm things up a little. A coat of amber-tinted lacquer will take care of that quite nicely.
As this instrument will be a 'black-burst', I've hit the edges first with some black pigmented lacquer. I get these coloured first, before moving on to the top and back and the actual burst.

Incidentally, the reason you're seeing the back of the guitar in all of these shots is that I'm spraying this in the old Fender style. On the front of the guitar are three nails that support it—raised—above a turntable. When spraying, I do the front first and then flip it to do the back. It's at this point I can more easily take a photo.
Now the money-shot. The burst has been applied to the body. For any readers who don't know what the hell I'm talking about with all this 'burst' talk, it's a method of applying finish with a gradual fade from one colour to another. Burst is short for 'sunburst' a term coined (I think) early in the last century. There are many kinds of sunburst finish and different manufacturers have different styles and methods but the most common are one and two graduating colours from a lighter centre (which, make what are called two or three-colour bursts).
In this case, we have a two-colour burst: Light amber at the centre graduating to black. A black-burst.
Nice.
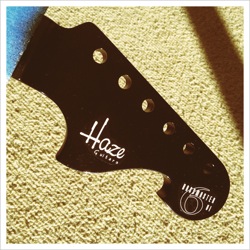
We'd better not finish up without a word about the neck. This neck has a dark, ebony fretboard. Couple that with this headstock and we've got a nice, Spinal Tap, none-more-black thing going on.
A silver Haze logo and a Bassmaster 6 logo applied and we're good to coat over with clear lacquer.
And that's where we're up to. This was all completed a while ago and is sitting, waiting for the lacquer to properly cure. At that point, I can wet-sand back the finish on neck and body before buffing the hell out out it to get things nicely glossy.
In the meantime, there are a few smaller jobs like cutting the pickguard (a custom shape so no easy route of buying something off-the-peg).
What should be the final update in this series soon. Stay tuned.