
Where's That Confounded Bridge?
 The title of this article reuses a—rather poor—joke that I first used on Twitter. It wasn't that great then but, as there's a recession, even the bad jokes have to be recycled.
Recently, I've spoken with a couple of people about bridge repair on acoustic guitars so I thought it might be useful to write something about what's involved.
The title of this article reuses a—rather poor—joke that I first used on Twitter. It wasn't that great then but, as there's a recession, even the bad jokes have to be recycled.
Recently, I've spoken with a couple of people about bridge repair on acoustic guitars so I thought it might be useful to write something about what's involved.
A 'lifting' bridge isn't uncommon on an acoustic guitar, especially a steel-string. There's a huge amount of tension on those six strings and the glue that holds the bridge to the top of the body has a lot to deal with. Sometimes, it begins to give way and one corner, or the back of the bridge, lifts a little. Maybe just a bit at first; not even enough to see. It usually doesn't stay that way, though, and soon you can store spare picks in the gap. Next, the thing bursts free and kills a kid in the front row of your gig (and one of the spare picks blinds his granny). Embarrassing or what?
 How do you avoid this?
Get it fixed, of course.
Now I know what you're thinking but, it's not enough to squidge a bit of glue into the gap and hope for the best. A proper fix for this means removing the bridge (after carefully softening the remaining glue), cleaning both surfaces (bridge and guitar top) and glueing it back in place.
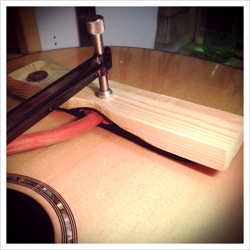
None of this is rocket science, but it is important that each step is done right. Removing the bridge is generally done by heating the bridge to soften the glue holding it. There are other methods but they're generally reserved for very extreme situations. Lots of the time, a heating blanket (pictured clamped to the bridge above right) will be fine but sometimes a bridge-removal iron has to be heated on a hotplate before being used to heat the bridge (again and again and again). When the glue's softened, it loosens its grip and it's usually possible to use spatulas and the like to work between the bridge and guitar top. It should go without saying that's it's very important that this is done well by someone who's had as much experience as possible. If this is forced or rushed, it's very possible that the freed bridge will take great hunks of the guitar top with it. That would be bad.
When the bridge is free, all of the bits of glue on it and the guitar top must be cleaned away, as must any natural oils from the bridge wood. I usually roughen up the wood on the bottom of the bridge once it's cleaned as it gives a better surface for the glue to adhere to.
 Then it needs to be glued back on. This needs a lot of care to make sure it will align properly (and stay there while the glue is drying). Sometimes I use a couple of modified bridge pins to help line things up.
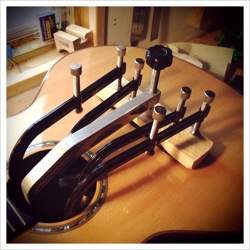
Good clamping is essential and that has to be considered. In some cases—like this one—I have to make a clamping caul especially for a slightly odd shaped bridge. A caul spreads the clamping pressure and helps ensure a strong glue joint. The photo right at the start of this article shows the clamping arrangement for this bridge repair. It's not always necessary to use so many clamps but that's generally dictated by the particular job. It's worth mentioning that (although not photographed) there are a number of cauls inside the guitar to protect the guitar top and to accommodate the bracing.
This sort of bridge repair for failed glue-joints is not uncommon but there's a bit of work needed to do it properly. Personally, I'd avoid the 'squidge-some-glue-in-the-gap-and-cross-your-fingers' method on any guitar you feel is a keeper. It might be enough to keep a cheapie beer-session strummer going for another while but it shouldn't be considered a sound repair on a good guitar.