Les Paul Neck Removal and Repair

Yikes. If you've been reading my stuff for a while, you've probably spotted a few different examples of neck breaks. Most of these have been up at the headstock end as that's the more likely place for a break.
It can happen down the other end too, though. This Les Paul took a tumble and broke in a nasty way. The exterior damage is obvious but it's pretty certain that crack extends into the neck tenon too (the tenon's the bit that gets glued into the neck pocket in the body).
This neck needs to come out to be properly repaired.
It's not too often that I need to remove a Les Paul neck, which is lucky as it's a relatively involved job. With a strong cup of tea to steel myself, I set to work.
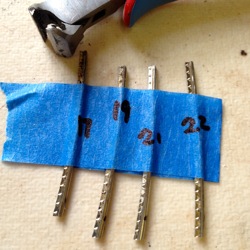

First up, a few frets need to come out. To remove this neck, I need to soak and steam the glue out and that means getting access to the internals of the neck joint. I do this by drilling small 'access' holes. These are drilled in the fret slots. When it's all done, I'll fill the holes with rosewood plugs and re-cut the slots. All of this is hidden by the refitted frets.
Your eagle-eyes will have noticed a little dot on each (numbered) fret. These frets will be refitted and the dot tells me which is the bass end.
Keeping fingers crossed, I take a look under the neck pickup, hoping for a long tenon. No luck. If I could have seen the end of the tenon, I'd know exactly what size it was so I could position my holes to accurately access the sides of the neck joint (if it's not clear what I mean here, a photo later on might clarify things).
Since all of this tenon is hidden, I have to measure out the usual Gibson size and position for this guitar and hope that it's built properly to spec.
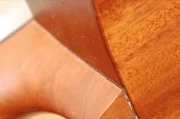
In the photo, above on the right, you can see the pencil marks I've used to plot out the tenon and the holes I've drilled to get access to the joint.


This one's a bit weird-looking, I'll admit.
In the left image, I'm using a syringe to insert boiling water into the holes I've drilled. I give it a few seconds and then suck it back up again. What comes out is cooler water with some manky-looking dissolved glue. I repeat this process a lot over the course of a couple of days. A Les Paul neck joint is a hell of a strong joint and doing this gives me a little bit of a head start before I hit it with the steam.
Which is what's happening on the right. That nozzle lets me get piping hot steam deep into the joint. The heat and moisture helps to dissolve more glue and, after some time and work, the glue eventually lets go…


…Leaving most of the bloody tenon still in the pocket. D'oh!
The heel crack extended into the tenon as we thought. Now I have to keep working to get this piece out with pretty much no leverage.
More tea required, I think.
Some steamy swearing later and it's out. Now, in the side of that neck tenon, you can see the tracks of those holes I drilled earlier. We were right on the money with the positions too—nice.
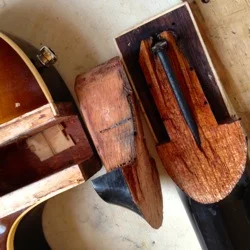

And here's the jigsaw we need to get back together. You'll notice a small shim in the neck pocket. This was installed at the factory (it's not uncommon) and I'll reuse it for this repair.
All of the old glue is cleaned from the mortice and the tenon and then, the two bits of neck are glued back together. Again, the tracks of those access holes are clear in the photo on the right.


Once it's sound again, the neck is reattached to the body. Those frets are reinstalled and all the frets are levelled to ensure clean playability.
Then, it's just some touch-up to hide the evidence. As the rear and neck of this Les Paul are black, the opaque colour easily disguises the repair.
It took a bit of thought, a lot of work and twelve buckets of tea but this job's a good 'un.