
What Size Hole?
The story, as I poorly recall, was this: In the days long before streaming and hundreds of channels, a TV station programmer received a complaint about repeats, "Why are you always airing reruns of The Flinstones?". His response was, "Every day, somebody's born who's never seen The Flintstones."
Podcaster Merlin Mann has told that story and uttered that phrase from time to time when he's about to repeat something or explain something that 'everybody knows'. It's stuck with me. I like the sentiment.
Why am I telling the story now? Well, if you've been hanging out with me for a while, you'll know we’ve gotten pretty deep into some guitary weeds. However, prompted by some questions I’ve had lately, I’m going to pull back a little and discuss a couple of basic tips and tricks. If you’re a seasoned maintenance veteran who can strip a Floyd Rose in the dark while roadies throw Pro Co RAT pedals at you, this stuff might be obvious to you. But, in an ‘every day, somebody’s born who’s never seen the Flintstones’ way, this will certainly be useful to many.
With that in mind, let’s talk holes and screws.

A while ago, someone emailed me to ask what size the holes in a Fender pickguard should be to accommodate the screws securing it to the body. Also, what size should the holes in the body be?
I didn’t have a clue.
Maybe this will get me kicked out of the Proper Spec-Knowing Luthier Society but there you go. I’ve said it. I just order Fender or Gibson pickguard screws but never bothered to learn their specifications. Until I got this question, it wasn’t something that had ever worried me.
With a slight sense of imposter syndrome, I ‘fessed up to the questioner and instead explained how I handle this stuff when it comes up.
Screw holes with clearance (e.g. pickguard holes)
A screw hole in a pickguard has to be bigger than the screw — it needs clearance around the screw. If not, the screw’s going to grip and bite into the pickguard, which could ride up on the threads as you try to screw it down. Worst case, it could split the plastic.

Sizing a drill bit to a pickguard hole
If you’re working with an existing pickguard, it’s easy enough to measure the existing holes. A taper gauge can tell you but you can also offer up a drill bit to an existing hole until you find one that matches its size. Simple as that.
If this is a new pickguard, you can work out the hole size based on the screws you’re using.
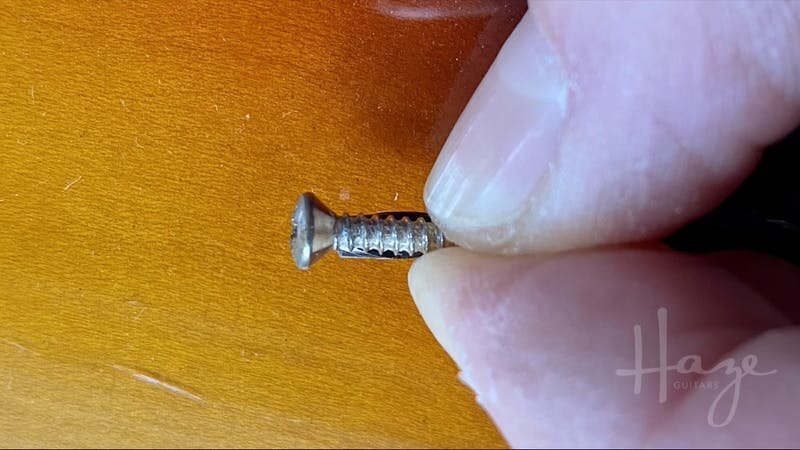
Offer up the drill bit to the screw itself. Hold the screw and drill bit so they’re ‘superimposed’ on each other. Try a few different drill bits until you find one that is a little wider than the outside edge of the screw threads. For this job, I find it easier to place the screw in front of the drill bit so I can see when the bit clears the screw.
Sizing a drill bit to a screw for pickguard holes
A bit just a little wider than the screw is fine but you don't generally need heaps of clearance. Too much and things don't fit so positively and can shift about. Much too much and your screw head won't grip so well (or even pass right through the hole 😮)
Pilot holes for screws (e.g. holes in the body)
If you're jamming two-by-fours together for some rough construction stuff, you can often just thread a wood screw straight into the wood. For your guitar, you'll want to avoid that business and start with some pilot holes.
Pilot hole is the term for a hole that you pre-drill before trying to install a screw. It is a really important precaution. A pilot hole provides a starting point for the screw so you can get an easier start and more precise placement. The pilot hole gives the screw a path to follow so it's less likely to wander as its screwed in.
Without a pilot hole, there's an increased risk of splitting the wood as the screw is inserted. The hole allows more breathing space — without it, there's more wood that the screw has to force out of the way, increasing pressure and split-risk. This helps protect the screw itself too. It's possible to damage screw slots or even wring off screw-heads if you're installing them into some hard woods without a good pilot hole.
Convinced? Ok. Let's see how to size our pilot holes.
We use a similar method to the last drill-bit/screw comparison but with an important difference. This time, we're not looking at the overall diameter of the screw but, instead, we're concerned with the screw shank.
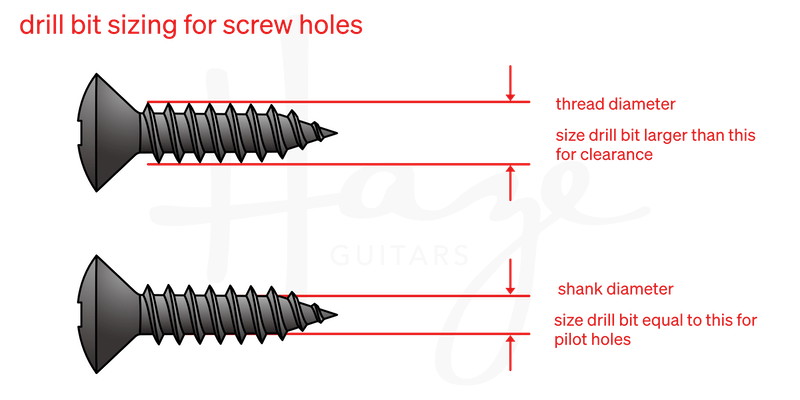
How to choose a drill bit for a screw size — clearance and pilot hole
The shank is the solid centre part of the screw. You can think of the threads as being attached to the shank if it helps visualise things . When we drill a pilot hole, we want to remove enough wood to let the shank pass through without trouble but leave enough that the screw threads can cut their path so they grip.
Offer your screw up to your drill bit as before. It's a good idea to place the screw behind the bit for this comparison. It's easier to assess the shank/thread/bit sizes.

Sizing drill bit to screw for pilot hole
You want to choose a bit that's about the size off the shank but one that leaves the rest of the screw threads showing either side. Too large a drill bit won't leave as much wood for the threads to grip and might make for a weak connection. A bit that's a little smaller than the shank will generally be ok but, as the wood you're using becomes harder, this becomes more critical to match well.
If the screw shank tapers a lot from tip to head, it might be necessary to drill more than once in the same pilot hole. A smaller drill bit for the length of the screw and then a larger one to widen the hole to accommodate the thicker part of the screw near the head. Depending on wood type and screw type, it might even be worth drilling multiple times to both, ensure a safe passage for the screw, and to leave enough wood for the threads to grip well. That's relatively rare in the guitar world but it's worth mentioning. Watch out for it occasionally with something like longer, heavier bridge screws.
Of course, this stuff applies to more than pickguards, bridges, and guitars. Anything that you need to screw to, or into, will benefit from a little thought on this stuff.
I'm going to talk a little more about drilling stuff next time.
This article written by Gerry Hayes and first published at hazeguitars.com


