
The Haze Super Light
Here I'll cover a workshop project that got more attention than I expected — a custom-built articulated lighting rig I put together for the repair bench. If you've ever struggled to get decent light exactly where you need it, this might be worth a few hours of your time to build. Fair warning: it gets pretty nerdy.
Intriguing title, eh? Of course, you may find the reality more nerdy than intriguing.
Hi again
Something happened a while back that made me think there is a subset (probably a small subset if I’m honest) of readers who might be interested in a little workshop/tool project I’ve been working on. Some of you may find it a useful thing to try in your own workshops and, hopefully, the rest of you will appreciate the nerdiness enough that you don’t immediately close the site and start doomscrolling to find out what awful thing is almost certainly happening somewhere. Stay. You get far less mental trauma here than on most of the internet. 😄
The folks at The Looth Group regularly host video chats, usually featuring a repairer/luthier demonstrating some techniques to help teach others and to generally make the wider repair community a better place. It’s a very cool thing — if you’re in any way interested in instrument repair, you should check it out and, if you're in the business, it's a no-brainer. I’ve learned a whole bunch of useful stuff there.
Anyway, a while back, me I joined the video chat a little early so I continued working away in my workshop as I waited. I was spotted and asked what I was doing.
What I was doing was some wiring for a new lighting fixture I’d built. This seemed to spark a nerdy interest in the folks on the call so I talked them through it. People seemed to like the idea. So much so, that Ian Davlin (who’s the force behind the Looth Group) and the crew pulled the clip of me talking about my new light and asked if they could publish it as a separate video on YouTube. Ha — what a bunch of nerds! 😄
So, since it seems that this might be useful to someone, I thought I’d talk a little about it here.
Behold The Super Light*
The background is this: Doing work like I do means I need decent light, often in awkward places. It’s always a struggle to get light jusssst where I need it. What I really want are two dentist’s articulated lights but they’re insanely expensive. So I made this monstrosity.
The light is provided by two cheapo IKEA Tertial work lamps that I’ve mounted on a crazy fixture I made. The whole thing hangs from the ceiling on a length of galvanised steel handrail that’s been mounted to a ceiling joist using a floor flange. Let’s call this the ‘post’.
And let’s call the part protruding from the post, the ‘arm’. The arm is a length of ¾” plywood with an extra strengthening rib glued on top. As well as adding some rigidity, the double layer means the arm is less likely to tilt on the post from all the weight at the free end. Actually, this weight (and a reasonably tight fit on the post) means the arm wedges in position and stays put without the need for any clamping. I can move the arm vertically up and down the post and it stays in place. The arm can also swivel all the way around (or at least until the cables get in the way).
The free end of the arm flares into a wider oblong platform with a sort of semi-circle from each side. The centre of each circle is drilled and acts as a pivot point for what I’ll call ‘pivot blocks’. A bolt through each pivot block secures them to the platform base and a star knob underneath lets me tighten each up if I want to keep it in place. Otherwise, the pivot blocks are free to rotate through (almost) 180º. There’s a stop block at the end of the platform/arm to keep them knocking off each other and snagging.
The pivot blocks are just a double layer of plywood. They’re drilled at one end to accept the IKEA light mounting post. The lights mount sideways into the pivot blocks and hang down.
All of this means that, as well as the standard articulation of the angle lamps, the pivot blocks can rotate almost 180 and the arm can also rotate, as well as moving up and down on the post. That’s a fair amount of adjustability. This is letting me have a lot of flexibility for good lighting here.
A couple of ‘security’ notes: The IKEA lights have a little notch in their mounting post. I’ve drilled my pivot blocks to accept a screw that protrudes into this notch. This keeps the lights from falling out of the pivot blocks. In a similar safety measure, I’ve added a bolt through the bottom of the ceiling post to prevent the whole unit accidentally coming off the post.
Here’s a pretty rough sketch outline that probably gives you enough info should you want to do something similar.
One final thing to note is that these IKEA lamps were not really intended to work upside down. While never amazing at staying put, their spring counterbalance system assumes they’re the other way around. I’ve had to do some experimenting with changing spring anchor points to provide more ‘hold’ in this orientation. I may even see if I can rustle up some stronger springs but that’s a nice-to-have rather than an essential.
And that’s The Super Light. It’s not too complicated and, if you do anything where you need light in awkward places, I reckon you’ll find it useful to spend a few hours building one.
I hope you’re nerdy enough to have enjoyed this workshop digression. We'll do something guitary again next time.
*This was named The Super Light by Ted Bergstrand (who was handling The Looth Group tech and video stuff) in the first edit of the video. I decided to run with it because it was better than its previous working title… When I showed a friend a photo of the new lighting rig, he replied, “Dear god! Alien autopsy!” Since then, I’d been calling it the Alien Autopsy Light. In the video, it’s since been upgraded to an ‘ingenious light’ but modesty prevents me from going with ingenious. Super Light it is. 😄

The background is this: Doing work like I do means I need decent light, often in awkward places. It’s always a struggle to get light jusssst where I need it. What I really want are two dentist’s articulated lights but they’re insanely expensive. So I made this monstrosity.
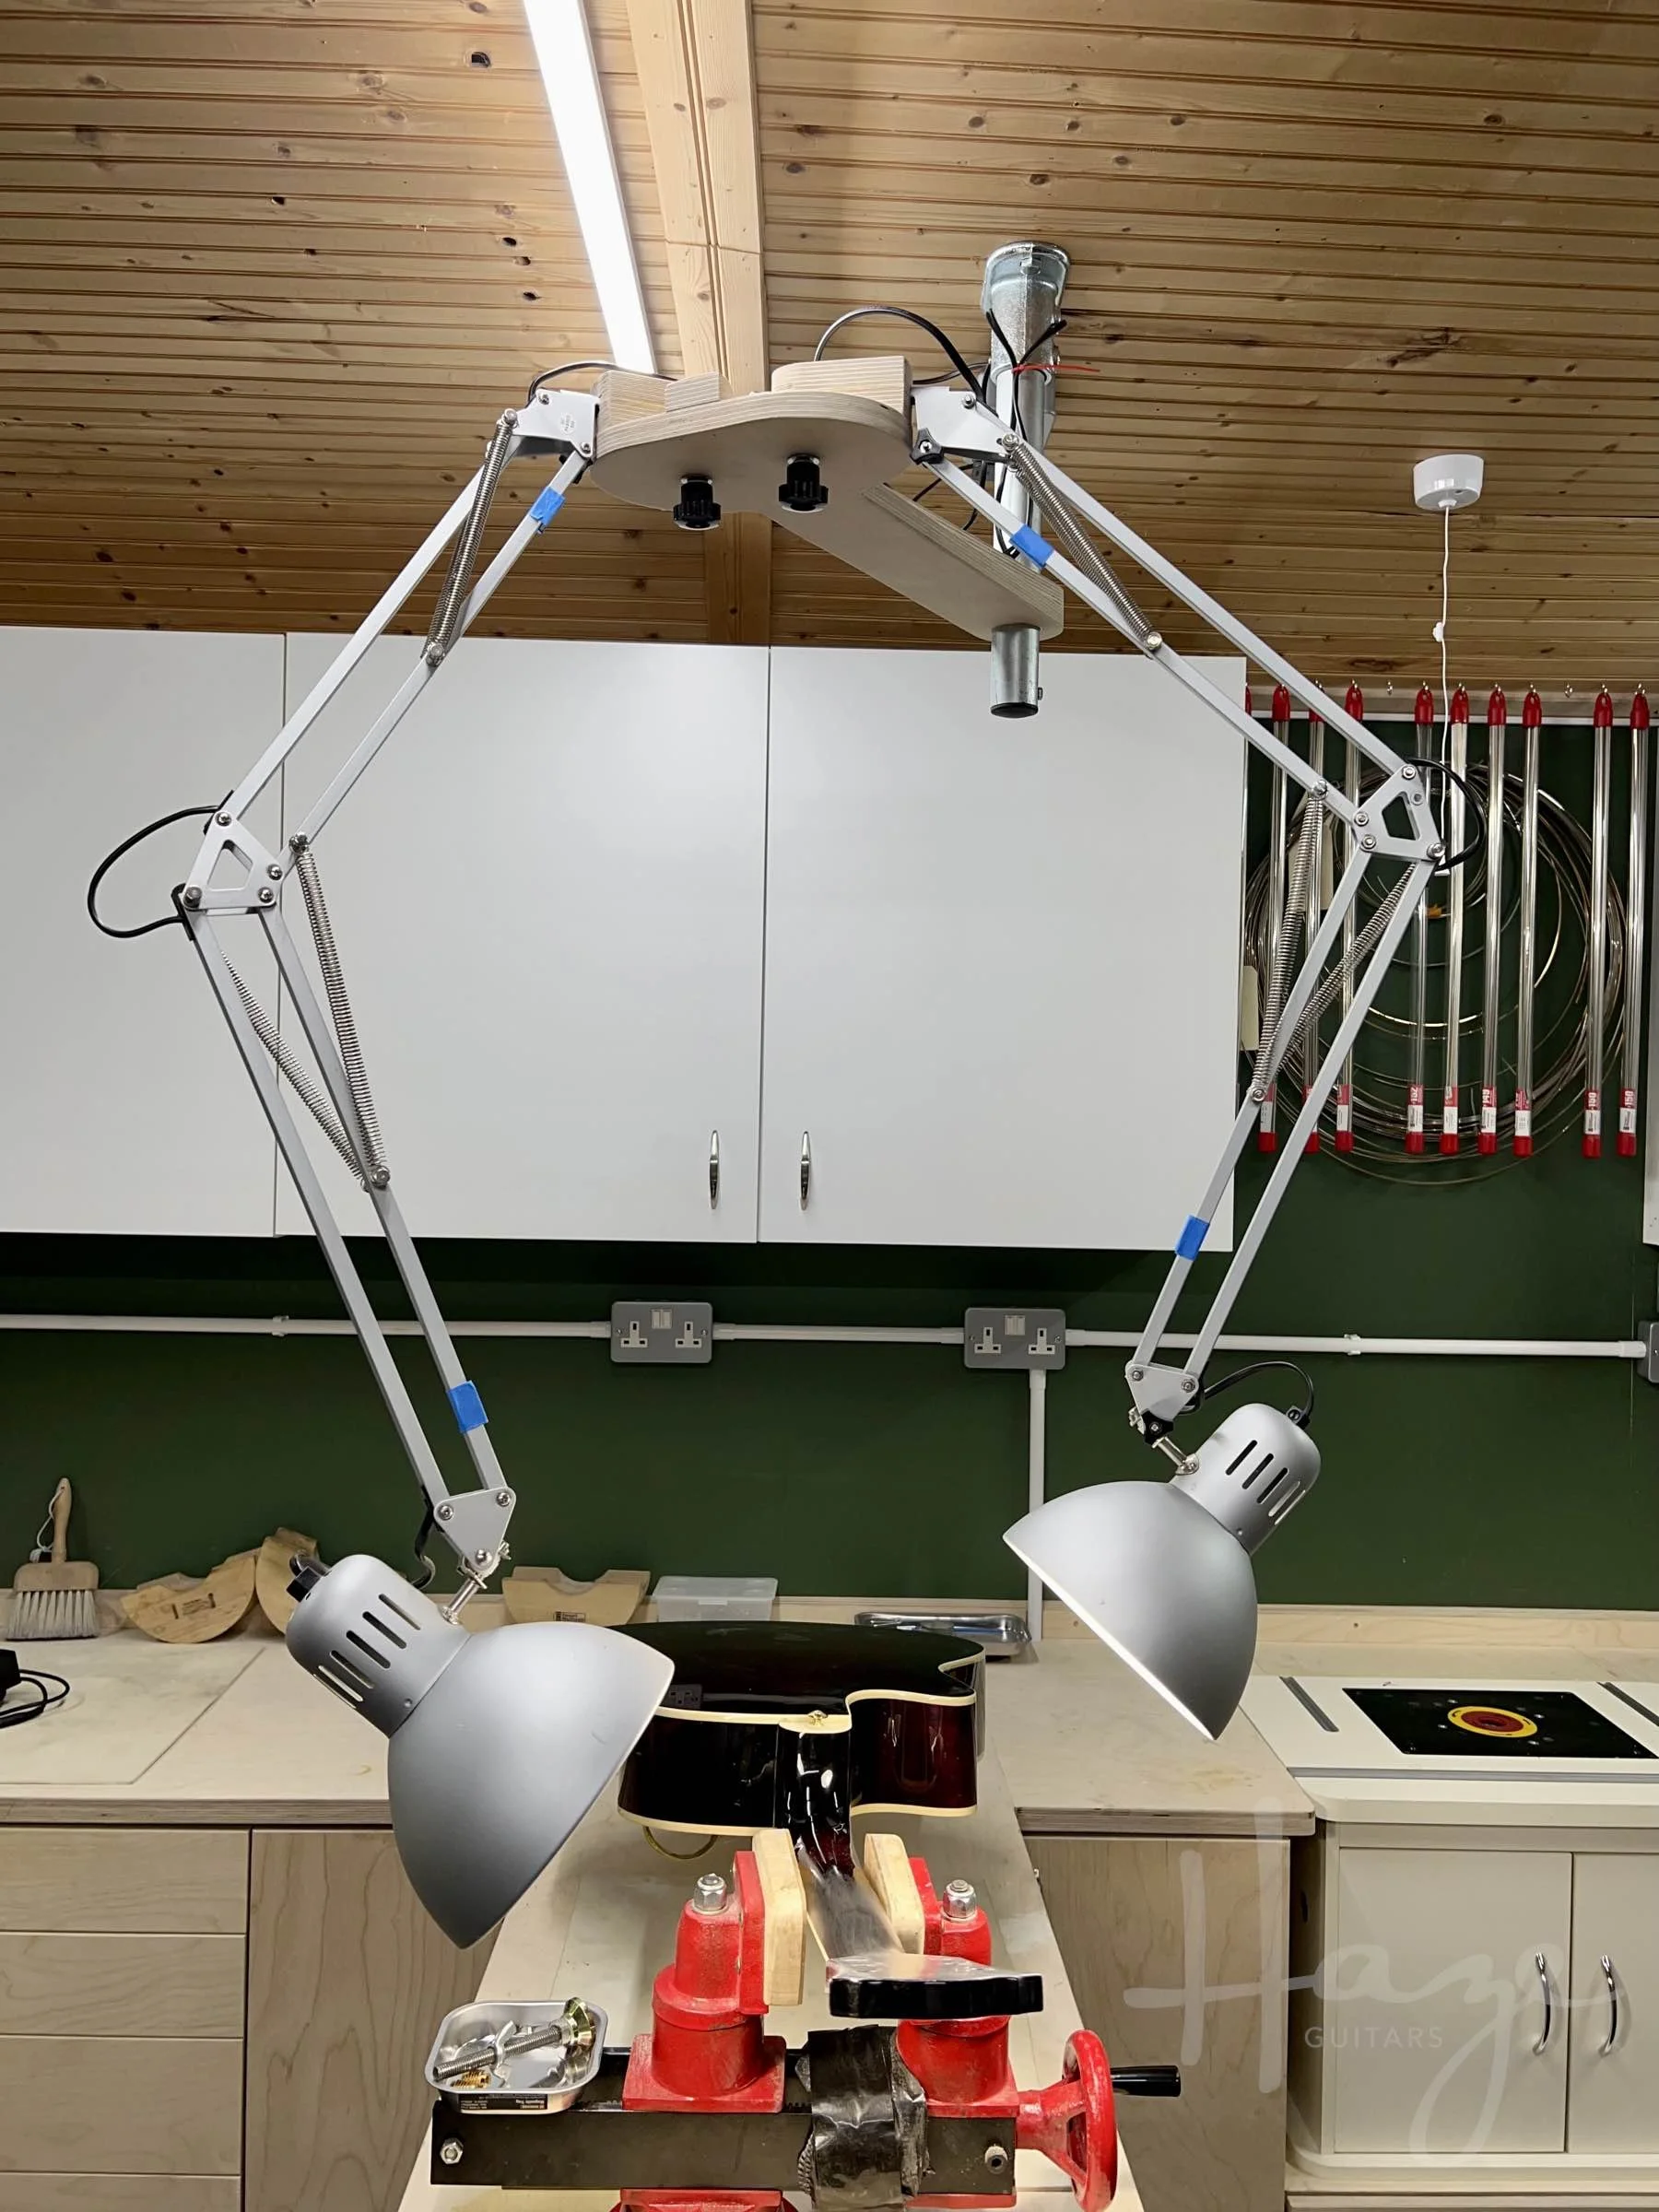
The light is provided by two cheapo IKEA Tertial work lamps that I’ve mounted on a crazy fixture I made. The whole thing hangs from the ceiling on a length of galvanised steel handrail that’s been mounted to a ceiling joist using a floor flange. Let’s call this the ‘post’.
And let’s call the part protruding from the post, the ‘arm’. The arm is a length of ¾” plywood with an extra strengthening rib glued on top. As well as adding some rigidity, the double layer means the arm is less likely to tilt on the post from all the weight at the free end. Actually, this weight (and a reasonably tight fit on the post) means the arm wedges in position and stays put without the need for any clamping. I can move the arm vertically up and down the post and it stays in place. The arm can also swivel all the way around (or at least until the cables get in the way).
The free end of the arm flares into a wider oblong platform with a sort of semi-circle from each side. The centre of each circle is drilled and acts as a pivot point for what I’ll call ‘pivot blocks’. A bolt through each pivot block secures them to the platform base and a star knob underneath lets me tighten each up if I want to keep it in place. Otherwise, the pivot blocks are free to rotate through (almost) 180º. There’s a stop block at the end of the platform/arm to keep them knocking off each other and snagging.

The pivot blocks are just a double layer of plywood. They’re drilled at one end to accept the IKEA light mounting post. The lights mount sideways into the pivot blocks and hang down.
All of this means that, as well as the standard articulation of the angle lamps, the pivot blocks can rotate almost 180 and the arm can also rotate, as well as moving up and down on the post. That’s a fair amount of adjustability. This is letting me have a lot of flexibility for good lighting here.
A couple of ‘security’ notes: The IKEA lights have a little notch in their mounting post. I’ve drilled my pivot blocks to accept a screw that protrudes into this notch. This keeps the lights from falling out of the pivot blocks. In a similar safety measure, I’ve added a bolt through the bottom of the ceiling post to prevent the whole unit accidentally coming off the post.
Here’s a pretty rough sketch outline that probably gives you enough info should you want to do something similar.
One final thing to note is that these IKEA lamps were not really intended to work upside down. While never amazing at staying put, their spring counterbalance system assumes they’re the other way around. I’ve had to do some experimenting with changing spring anchor points to provide more ‘hold’ in this orientation. I may even see if I can rustle up some stronger springs but that’s a nice-to-have rather than an essential.
And that’s The Super Light. It’s not too complicated and, if you do anything where you need light in awkward places, I reckon you’ll find it useful to spend a few hours building one.
I hope you’re nerdy enough to have enjoyed this workshop digression. We'll do something guitary again next time.
*This was named The Super Light by Ted Bergstrand (who was handling The Looth Group tech and video stuff) in the first edit of the video. I decided to run with it because it was better than its previous working title… When I showed a friend a photo of the new lighting rig, he replied, “Dear god! Alien autopsy!” Since then, I’d been calling it the Alien Autopsy Light. In the video, it’s since been upgraded to an ‘ingenious light’ but modesty prevents me from going with ingenious. Super Light it is. 😄
This article written by Gerry Hayes and first published at hazeguitars.com


