
Teeter-style Refret Saves The Day
I was working on a refret recently and came across something that comes up now and then. I thought it might be interesting to discuss.
First though, little guitar repair history for context (although it comes with a disclaimer that I’m not 100% certain of the provenance here). Sometime back in the 1980s (I think) a guy called Don Teeter developed a method for fretting or re-fretting a guitar. Don had already written a couple of well-received books on acoustic guitar maintenance and repair in the ’70s and, for a while, the Teeter Method of fretting gained a good amount of traction within the luthier community. I seem to remember it being discussed a lot when I started dipping my toe into this area in the ’90s.
Before talking more about the Teeter Method, I should take a slight tangent to revise fret wire concepts (is this a tangent on what’s already a tangent?).
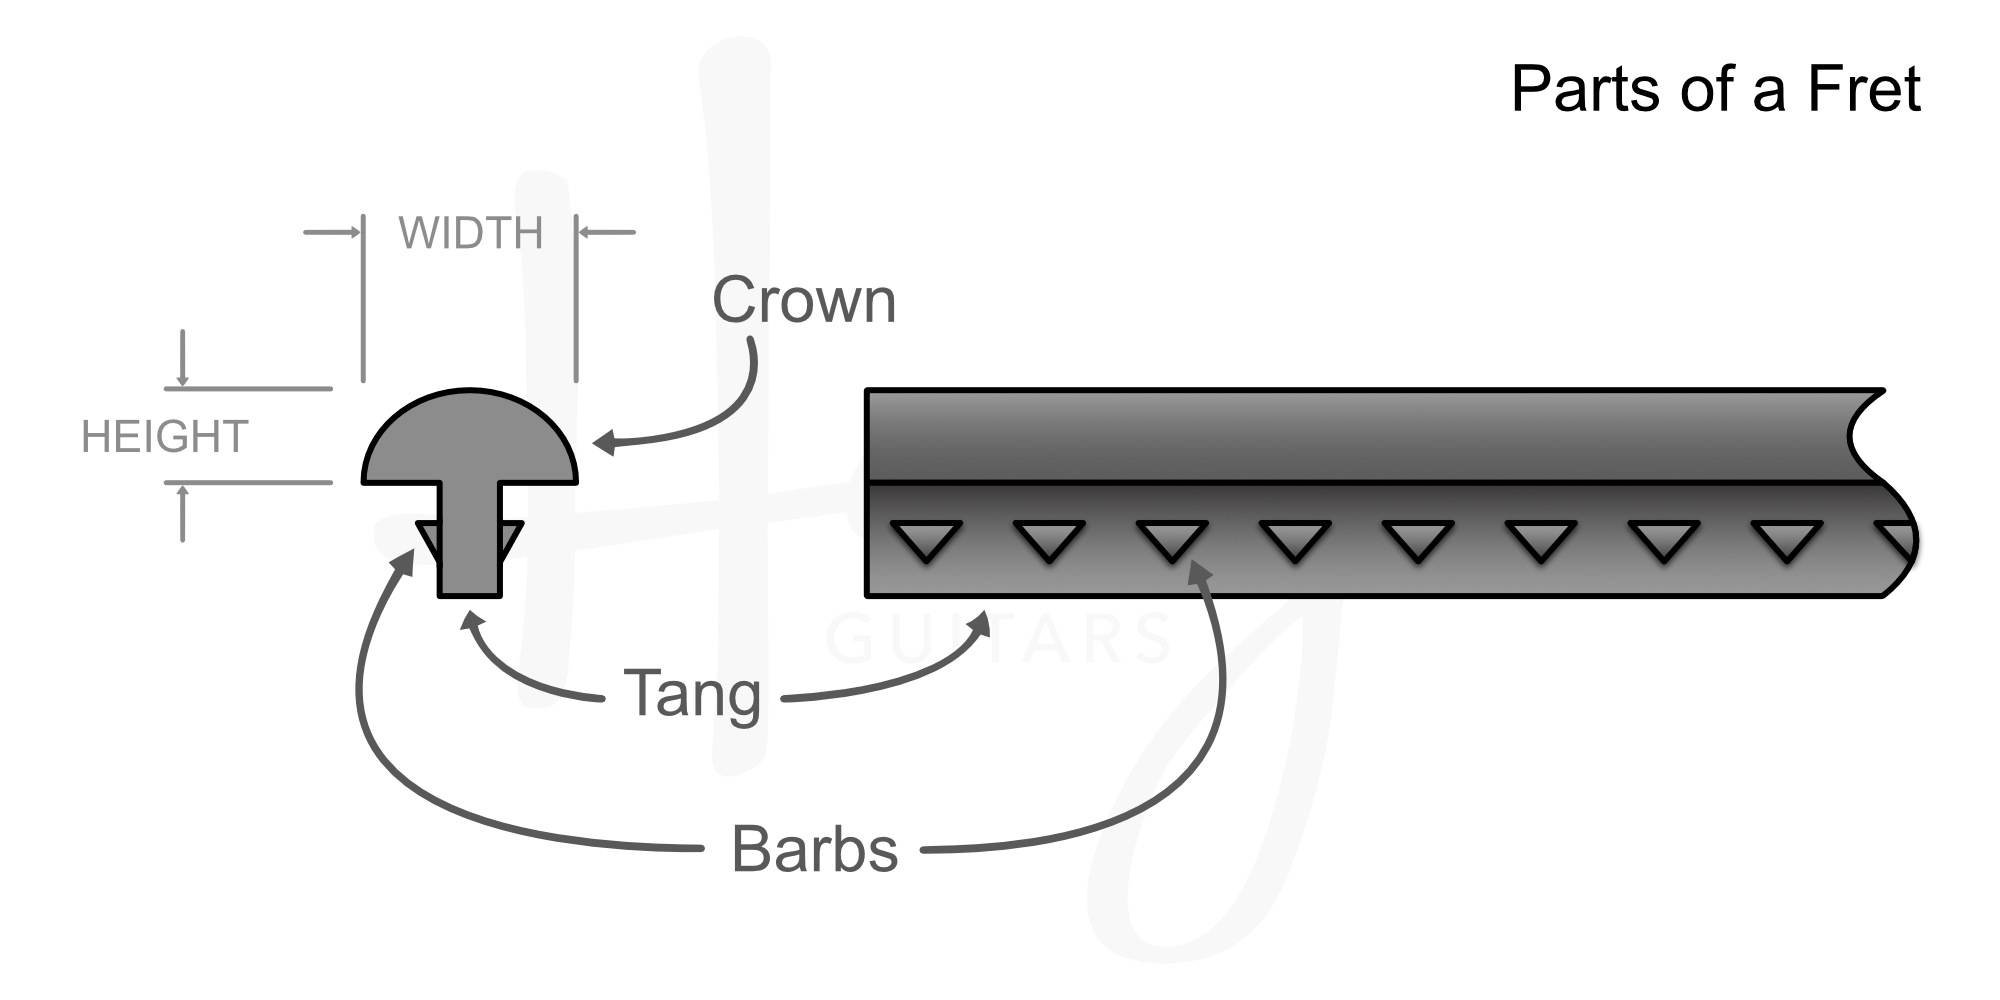
Modern fret wire has a crown and a tang. The crown is the part you see sticking out of the fretboard on your guitar—the part the strings contact when you play—and the tang is the part inserted into slots in the fingerboard. To help the frets stay put, the tang generally has a series of barbs along its sides. So, the idea is that you’ll cut slots in the fingerboard that are the same width or just a tiny amount wider than the tang (a couple of thousandths of an inch) and the barbs will grip the sides of the slot as the fret is inserted. Because of the close tolerances, the fret is usually pressed or hammered into the slot. The tang mostly fills the slot and the barbs keep the fret in place. So far, so regular-fretting.
Back to Don Teeter. He tried something different. Instead of a pressing the fret into tight-fitting slot, he used wider slots*. The fret could be pressed in with your fingers. No interference fit, no barbs compressing and grabbing wood. To keep his frets in place, Don filled the slots completely with glue.
Now, glueing frets is nothing new and wasn’t when Don started this. I’ll often glue frets into place if I worry there’s a risk they may not hold and wicking superglue under frets is a well worn path for addressing lose or rising frets. The difference is that I, and others, add glue in addition to the grip of the barbs. Don took the barbs and tang-to-fingerboard grip out of the equation completely.
So, the slots are filled with glue (epoxy is most commonly touted but other glues are used too), the frets are inserted, and they’re clamped down with a radiused clamping caul until the glue dries. The idea is that this provides (a) a nice, clean and level fret installation and (b) frets that don’t rise or come loose.
Now, in the years (decades 😬) since then, the Teeter fretting method has become less of a topic. I think that most builders and repairers have settled back into ‘regular’ fretting. Where glue is used, it’s in addition to barb-grip. I’ve really only went out of my way to do a Teeter fret job a couple of times. Mostly, it’s not something I think about.
Unless fate forces your hand, of course.
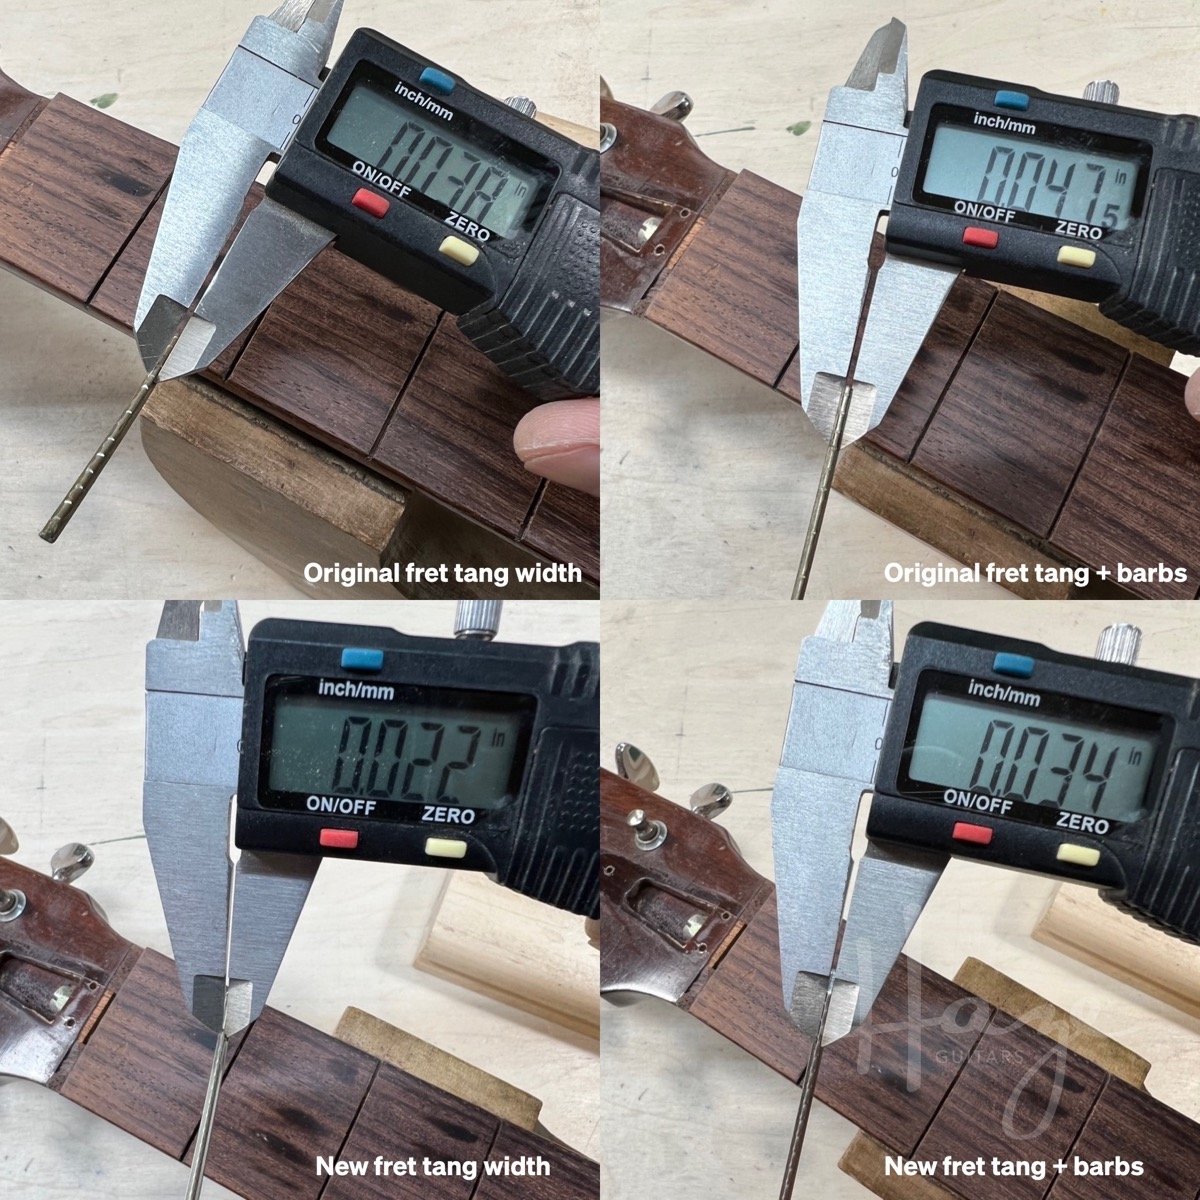
Back where I came in, I was working on a refret and found that the original frets were made with a pretty hefty tang. A reasonably standard width for modern fret tangs is around .020 to .022” (.51–.56mm). The tangs on these frets were around .038” (.97mm) wide. That’s a pretty big difference—it's actually wider than the entire tang-plus-barb width of the replacement wire. The fingerboard slots were sized to match the wider, original, tangs and the new wire could be press-fitted into the slots with almost no pressure.
One option here would be sourcing some wire with a larger tang. Ages ago, you could buy wire with different tang sizes from Martin and it could be used for this sort of eventuality (or, more frequently, when doing some corrective fret-work to compress necks with no truss rods into the right amount of relief). Jescar are now supplying similar wire but neither I, nor my customer, wanted the extra wait and expense of ordering and shipping.
So, Don Teeter to the rescue. I already had the perfect sized slots and fret tangs for this. It’s a straightforward job to do a Teeter refret here.
Personally, I don’t use epoxy for this job. While epoxy will eventually give up its grip with heat, it’s tenacious and messy and I just don’t like leaving an epoxy refret for the next person down the line. If I’m being honest, I also don’t like working with epoxy so that does factor in the decision process.
The actual fretting is reasonably straightforward with some things to consider. Typically, for hammering home frets, we’d bend the fret wire into a radius that’s tighter than the fingerboard. That helps prevent the ends popping up as they’re hammered in. For a Teeter job, we want to radius the wire as closely as possible to the fingerboard (err on the side of a tiny bit smaller if you can’t match it precisely).
If you’re working with epoxy or CA glue, you’ll want to carefully wax the fingerboard surface first. Otherwise, cleaning squeezed-out glue from the wood will be a nightmare. The wax prevents the glues adhering to the fingerboard and makes clean-up much less swear-inducing. I’m using hide glue here (bottled is just fine for this as long as it’s fresh) so I’m not so fussy about that. I know I can clean up squeeze-out relatively easily afterwards. Also, I’m pretty good about cleaning up the bulk of the squeeze-out as I go so I don’t get left with much at the end.
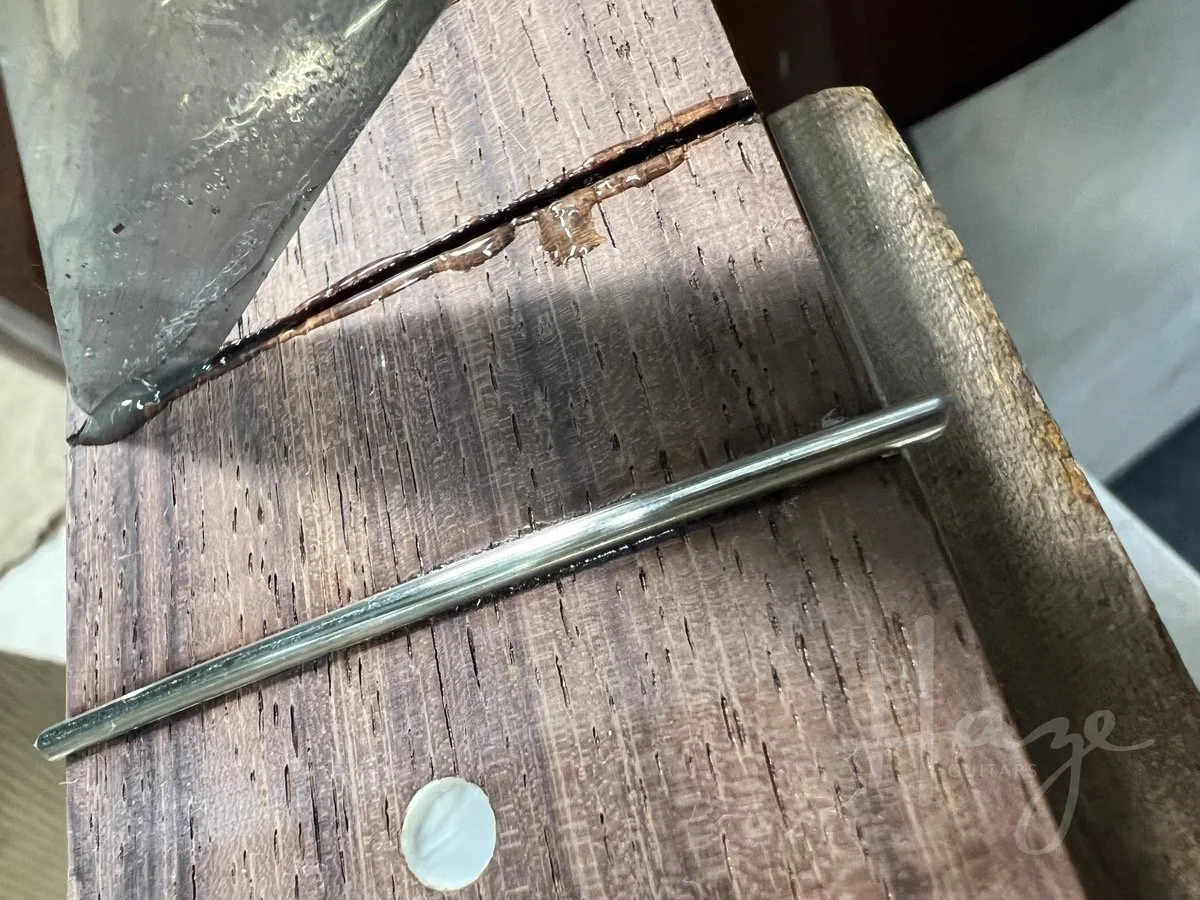
Fill the fret slot with glue. Use a feeler gauge or spatula to really work it in there—you don’t want any gaps or air bubbles. Press home the fret. Move on to the next.
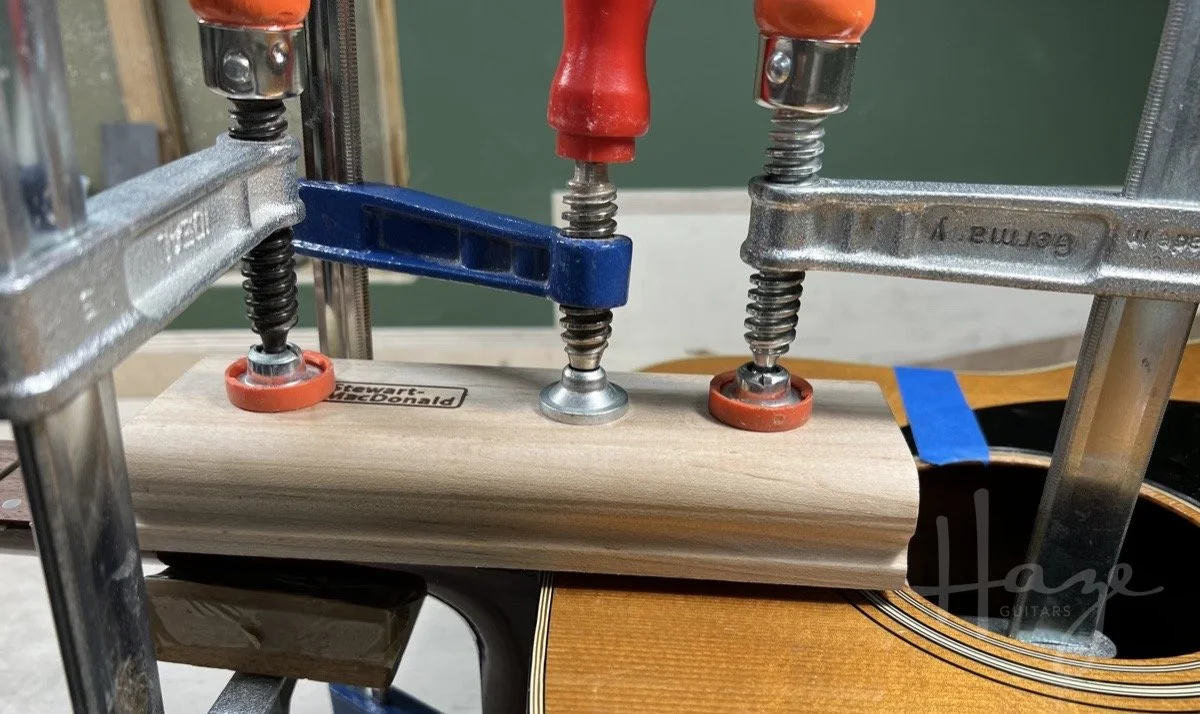
Use a radius block as a clamping caul to press down on the frets while the glue dries. Remember that the frets are, for all intents and purposes, already seated. The radius block is really just to even out any discrepancies and to keep them in place until the glue cures. This means you don’t need to crank on the clamps. Enough pressure to keep everything seated as evenly as possible is the aim here. During the height of Teetermania (😉) a lot of people made interesting clamping cauls that would better conform to fingerboard radii. I find a standard radius block just fine.
Give them enough time for your glue to go off and unclamp. Do whatever clean-up is needed for glue squeeze-out (although, if you keep things clean as you progress from fret to fret, you shouldn’t have to much do to). Then, you can complete your refret stuff as usual. Snip the ends, bevel, level, crown, etc. If all has gone well, you’ll have a reasonably level fret job. If—like me—you’re using a radius block that’s only half the length of the fingerboard, you might find you’ve a little more levelling to work out the slightly different heights at each end due to variation in clamping pressure at each end.
And that’s it. The Teeter method may not be as commonly performed as it used to be but I reckon it’s still got a place for the occasional odd refret you come across. Don Teeter passed away in 2021 and it feels nice to be able to use this idea to help out still.
*A little disambiguation (or possibly just adding more ambiguity): This fretting method is sometimes described as using wider fret slots and sometimes as using narrower fret tangs. The tangs on regular frets can be filed down to remove the barbs and even to narrow the tangs themselves. Wider slots or narrower frets amounts to the same easy press-fit of the frets, though.
This article written by Gerry Hayes and first published at hazeguitars.com


